
I’ve come dangerously close to destroying my TV at least three times during VR workouts.
Not because I ignored warnings—the Quest 2 has solid safety systems. Guardian boundaries, virtual walls, visual alerts. All very smart, well-designed.
But here’s what my Mad Scientist brain eventually learned: VR fitness space doesn’t care that it’s virtual. Your walls, furniture, and fragile electronics are still very real. And they will absolutely remind you if you forget that.
THE EXPERIMENT THAT CHANGED EVERYTHING
One moment burned this lesson into my brain permanently.
I was playing Golf5 with a cheap club attachment. Bad design. Weak grip. Controller wasn’t tightened properly. Mid-swing, physics took over. The controller launched itself out of the attachment and flew straight into the wall. In that split second, my brain ran the worst-case experiment: What if that wall was a TV? A window? Something far more expensive than drywall? Luckily, it was just drywall. The controller survived. Nothing valuable destroyed. But that was enough.
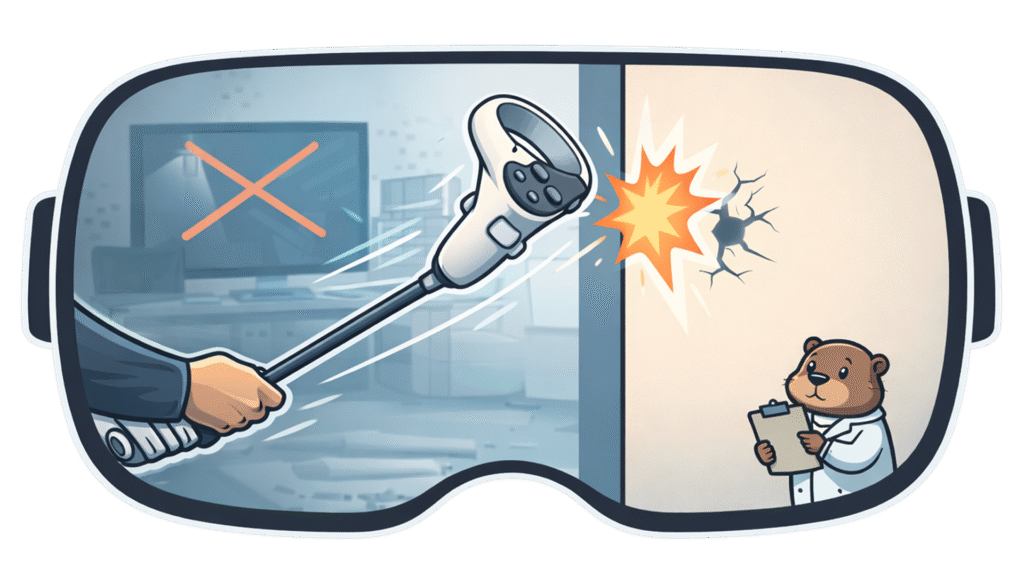
VR fitness needs space. Real space. Measured space. Protected space. And absolutely nothing valuable within your swing radius—just in case the experiment goes sideways.
As your friendly VR Fitness Mad Scientist (lab coat optional), I’ve spent months refining my setup through trial and error—heavy emphasis on error. I’ve punched walls, kicked furniture, clipped shelves, and learned lessons the expensive way so you don’t have to.
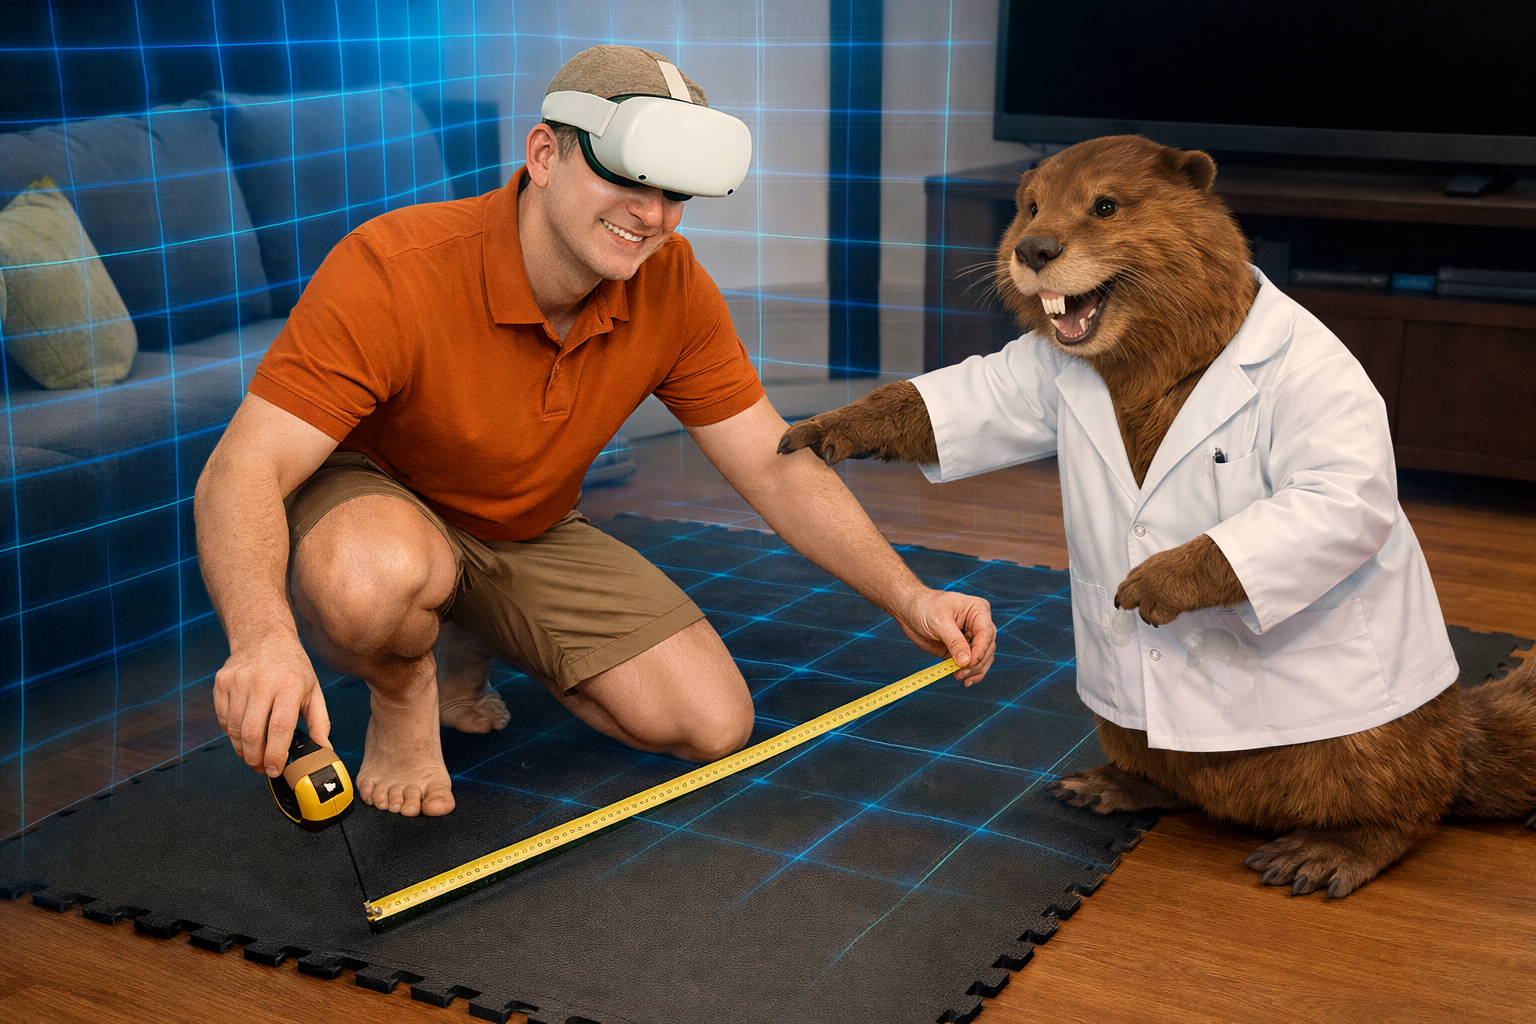
Consider me the test dummy who survived. Even my lab assistant—Will the beaver—now knows the drill. If he hears frantic punching sounds followed by silence, another experiment went wrong.
This guide covers everything you need to set up a VR fitness space that actually works—without destroying your gear, furniture, or yourself. Let’s dive in.
WHY VR FITNESS SPACE SETUP MATTERS
VR fitness isn’t like traditional workouts. You’re not on a treadmill or lifting weights in one spot. You’re punching in all directions, twisting 360 degrees, lunging sideways, and rotating without seeing your real hands.
Your body is in your living room. Your mind is in the Metaverse. Your fists don’t care which one they hit. That disconnect is why setup matters.
The Quest 2 has excellent safeguards—Guardian boundaries are genuinely impressive. But they only work if your real-world space is prepared first.
The brutal truth I learned the hard way: most people underestimate how much space VR fitness needs. Then drywall teaches them otherwise.
The good news? Quest 2 makes it easy to create your own virtual cubicle in almost any room. Drift too far and a glowing boundary appears—no electric shock (sadly), just a bright warning grid that says “Hey scientist, step back.” It works beautifully if your space is set up correctly.
HOW MUCH SPACE DO YOU ACTUALLY NEED?
Bare Minimum: 6×6 feet
This is the absolute minimum I recommend. For apps like Supernatural, you’re mostly moving in place—turning, punching, shifting stance. If you stay aware of your center point, this can work.
The Quest 2 helps here. When you drift, a small arrow appears guiding you back to center. That arrow has saved me more times than I can count. Without it, I absolutely would’ve punched the wall—like I did early on. It’s usable, but requires focus.

Ideal Space: 8×8 feet
This is the sweet spot. An 8×8 area lets you fully commit—lunges, crouches, powerful punches—without constantly worrying about what you might hit. VR fitness becomes immersive instead of stressful.
Yes, Quest lets you outline real-world obstacles, but honestly? Nothing should be inside your VR cubicle. Think padded room. Nothing to hit. Just you, the workout, and questionable scientific decisions.
MY SETUP AT THE LAB
I use a separate room dedicated to VR fitness. I built my VR cubicle using interlocking gym foam pads. The main pad area is 4×4 feet, with another 4 feet of clear space around it—no walls nearby.
Here’s the genius part (even Will agrees): the pads create a subtle elevation change. The moment I step off them, I feel it. That physical cue instantly tells my brain I’ve left my VR cubicle. I pause, recenter, and continue. This one simple trick has prevented countless lab accidents.
SETTING UP YOUR VR SPACE ON QUEST 2
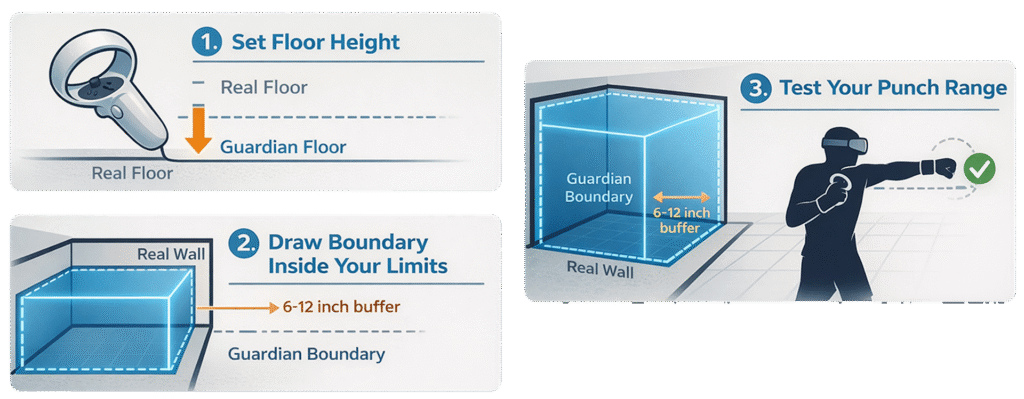
Quest 2 gives you two boundary options: Roomscale for custom space, or Fixed Point for a small halo around you. For workouts, Roomscale is the only correct answer.
Here’s the best-practice Guardian setup. Put on your headset and go to Settings, then Guardian. Set your floor height by touching the controller to the ground. Draw your boundary about 6 to 12 inches inside your real limits—this is critical. Stand in the center and recenter your view. Finally, extend your arms at punch height, not resting at your sides.
If you can fully extend without hitting the Guardian wall, congratulations—your experiment is stable.
Pro tip: Always draw Guardian while holding controllers like you’re actually working out. Your punch range is bigger than you think.
MY VR FITNESS SPACE SETUP (STEP-BY-STEP)
Step 1: Measure Your Space
Grab a measuring tape and painter’s tape. Stand in the center of your planned space and fully extend your arms in all directions. Add at least a one-foot buffer on all sides—don’t skip this. Mark the corners with tape on the floor. This is your VR fitness cubicle.
I skipped this step on Day 1. By Day 3, I’d punched a wall twice and kicked my coffee table once. That data was expensive. Measure first.
Step 2: Remove All Hazards
Everything inside your VR cubicle needs to go. Coffee tables, floor lamps, chairs, pets (seriously—lock them out), loose rugs that create tripping hazards, and any random objects. Clear it all out.
What can stay nearby, but outside your cubicle? A microfiber towel for sweat and lens cleaning. A water bottle for hydration. Your phone for emergencies or music control. A floor fan for cooling between rounds.
If I had MrBeast-level funding, I’d build a ventilated stage with air blasting from the floor. For now, a basic fan works. Will approves.
Step 3: Protect Your Space (And Your Wallet)
Floor Protection
Interlocking foam mats are essential, typically costing thirty to fifty dollars. They define your play area visually, protect your floors from sweat, provide a non-slip surface for stable footing, and are easy to clean. Most importantly, they create a physical boundary you can feel.
The moment your feet leave the mats, you’ll notice. It’s a powerful safety cue that has saved me countless times.
A yoga mat works as an alternative I have a friend that has this, it works well, but i like my interlocking pads.
Wall Protection
If your space is tight, wall protection becomes important. Foam padding for nearby walls works well. Pool noodles on sharp corners are a cheap hack that actually helps. Move furniture at least two feet away from your play area. Or accept that minor dings are battle scars from early experiments—I’ve made peace with mine.
Ceiling Clearance
Don’t forget to check your ceiling height. You need at least seven feet of clearance, and eight or more is ideal. Golf swings require full backswing height. Overhead punches in boxing need room. Jump squats in flow workouts demand vertical space. Ceiling fans are enemy number one.
During Golf5, my backswing nearly hit my ceiling fan. I now check clearance every single session.
Step 4: Lighting Setup
Good lighting is critical for Quest 2 tracking. Bright overhead lighting or natural daylight works best. I upgraded to a LED bulbs lamp in my room, and tracking improved instantly. I put on my desk in front of me, outside my VR cubicle.
What doesn’t work? Dim mood lighting causes the Quest to lose tracking. Heavy backlighting from windows behind you confuses the sensors. Dark rooms trigger constant warnings. Even reflective TV screens can cause intermittent issues—try covering them if you have tracking problems.
COMMON SETUP MISTAKES
The most common mistake is not measuring your space before starting. This usually results in punched walls, broken controllers, and expensive lessons. Measure before playing, not after destroying stuff.
Another frequent issue is setting the Guardian boundary too close to real-world walls. This leads to constant boundary warnings that break immersion. Add a six to twelve inch buffer inside your actual walls to fix this.
Ignoring ceiling height is a classic error, especially for golf and boxing games. Check overhead clearance for every game type you plan to play.
Leaving furniture inside your play area almost guarantees you’ll kick or clip something. During an intense squat session, I kicked my coffee table so hard I saw stars. Move everything or play somewhere else.
Finally, not recentering regularly causes you to drift into walls mid-workout. Recentering takes two seconds and prevents most accidents. Do it every ten to fifteen minutes.
ESSENTIAL VR FITNESS SPACE ACCESSORIES
Must Have Items
Interlocking floor mats cost thirty to fifty dollars and are your foundation. Get six to eight tiles depending on your space. Foam or rubber material works well. They’re easy to clean and have non-slip bottoms.
A microfiber towel for around ten dollars is essential. Use it to wipe your face between rounds and clean lenses when they fog. This is basic hygiene for VR fitness.

A measuring tape costs about eight dollars and is a one-time purchase. Use it to verify your space dimensions and check clearances properly.

Nice to Have Items
A floor fan costs thirty to forty dollars and makes a huge difference. It provides cooling between sets, makes summer workouts bearable, and reduces overall sweat.
Wall padding runs twenty to forty dollars and is worth it if your space is tight. It protects both your walls and you, plus gives you peace of mind during intense sessions.
LED light lamp cost fifteen to twenty-five dollars and are an easy upgrade. Brighter lighting equals better tracking. The improvement is immediate and noticeable.
Can Skip These
Fancy RGB lighting looks cool but doesn’t help your workouts. Expensive gym flooring is overkill—foam mats work just as well. VR treadmills cost five hundred to two thousand dollars and are complete overkill for fitness.
SPACE SETUP CHECKLIST
Before your first VR fitness workout, verify these items. Have you measured your space with a minimum of 6×6 feet? Did you remove all hazards from inside your play area? Are your floor mats installed and secure? Have you tested your lighting to ensure it’s bright enough for tracking? Did you set your Guardian boundary with a proper buffer? Is your ceiling clearance verified at seven feet or more? Do you have a towel within reach? Is water nearby? Is your phone accessible? Did you tell your household you’re working out so they don’t interrupt?
I know I’m repeating myself here, but trust me — I didn’t learn this from a manual. I learned it the hard way. Repetition is cheaper than replacing a TV.
Going through this checklist once prevents dozens of problems later.
HOW MUCH DOES A GOOD SETUP COST?
A budget setup runs thirty to fifty dollars. This covers floor mats only, using your existing lighting and moving your existing furniture around.
An ideal setup costs eighty to one hundred twenty dollars. This includes quality floor mats for forty to fifty dollars, an LED lighting upgrade for fifteen to twenty-five dollars, and accessories like a towel and fan for twenty to thirty dollars.
Is it worth it? Absolutely. Compare these costs to replacing a TV at five hundred dollars or more, drywall repair at forty to one hundred dollars, a new controller at seventy dollars, or medical bills if you actually hurt yourself. Prevention is cheap. Repairs are expensive.
FINAL THOUGHTS
A proper VR fitness space isn’t about perfection—it’s about safety, comfort, and not destroying your stuff while staying immersed in the Metaverse.
I’ve punched walls, scared pets, nearly hit ceiling fans, and conducted enough failed experiments to earn my lab coat. You don’t have to learn these lessons the hard way like I did.
Measure twice. Punch once. Even Will agrees.
YOUR TURN
Where do you work out? Living room? Basement? Garage? Have you destroyed anything yet? Be honest—we’ve all been there.
Drop your setup stories in the comments. I read every one.
Here is my review for Golf5, check it out.
AFFILIATE DISCLOSURE
A quick word from our sponsors (aka, my wallet): As an Amazon Associate, I earn from qualifying purchases. This means if you click a link on my blog and buy something, I may earn a small commission at no extra cost to you. I only recommend products I personally own, use, and love. If I recommend a product I haven’t personally tested, I will always clearly state that. Transparency is key, both in fitness and in business.
2 thoughts on “How to Set Up Your VR Fitness Space (Without Punching Your TV)”